All posts by date
Showing everything matching: clear
2022
Front-end here I go
14 Feb 2022
Hey.
Ahh, February! 14th the perfect time to get good news, I guess ?
So I enrolled in this program called “LaunchX” sponsored (I don’t really know how it works) by Microsoft where you have the chance to learn how to be a developer (FrontEnd and BackEnd), the first assignment was doing some python programs and upload the results, the programs were not that hard, but I can understand that it could be a little much if this is your first time at it (I forgot to mention that the program is open for everyone).
I pass that step, and now I wait for the FrontEnd course to begin, to be honest I never really cared about Web Development, but some projects I’ve in mind might benefit from it, so here we go, it’s going to be interesting.
Btw I’m still at my Masters, and soon I’ll start writing my Thesis.
bye
3D printer goes prrr
30 Jan 2022
Hey.
So I guess that at this point everybody knows or knows somebody who knows or has a 3D printer, in case you’ve missed it (somehow ?) I present to you the 3D printer
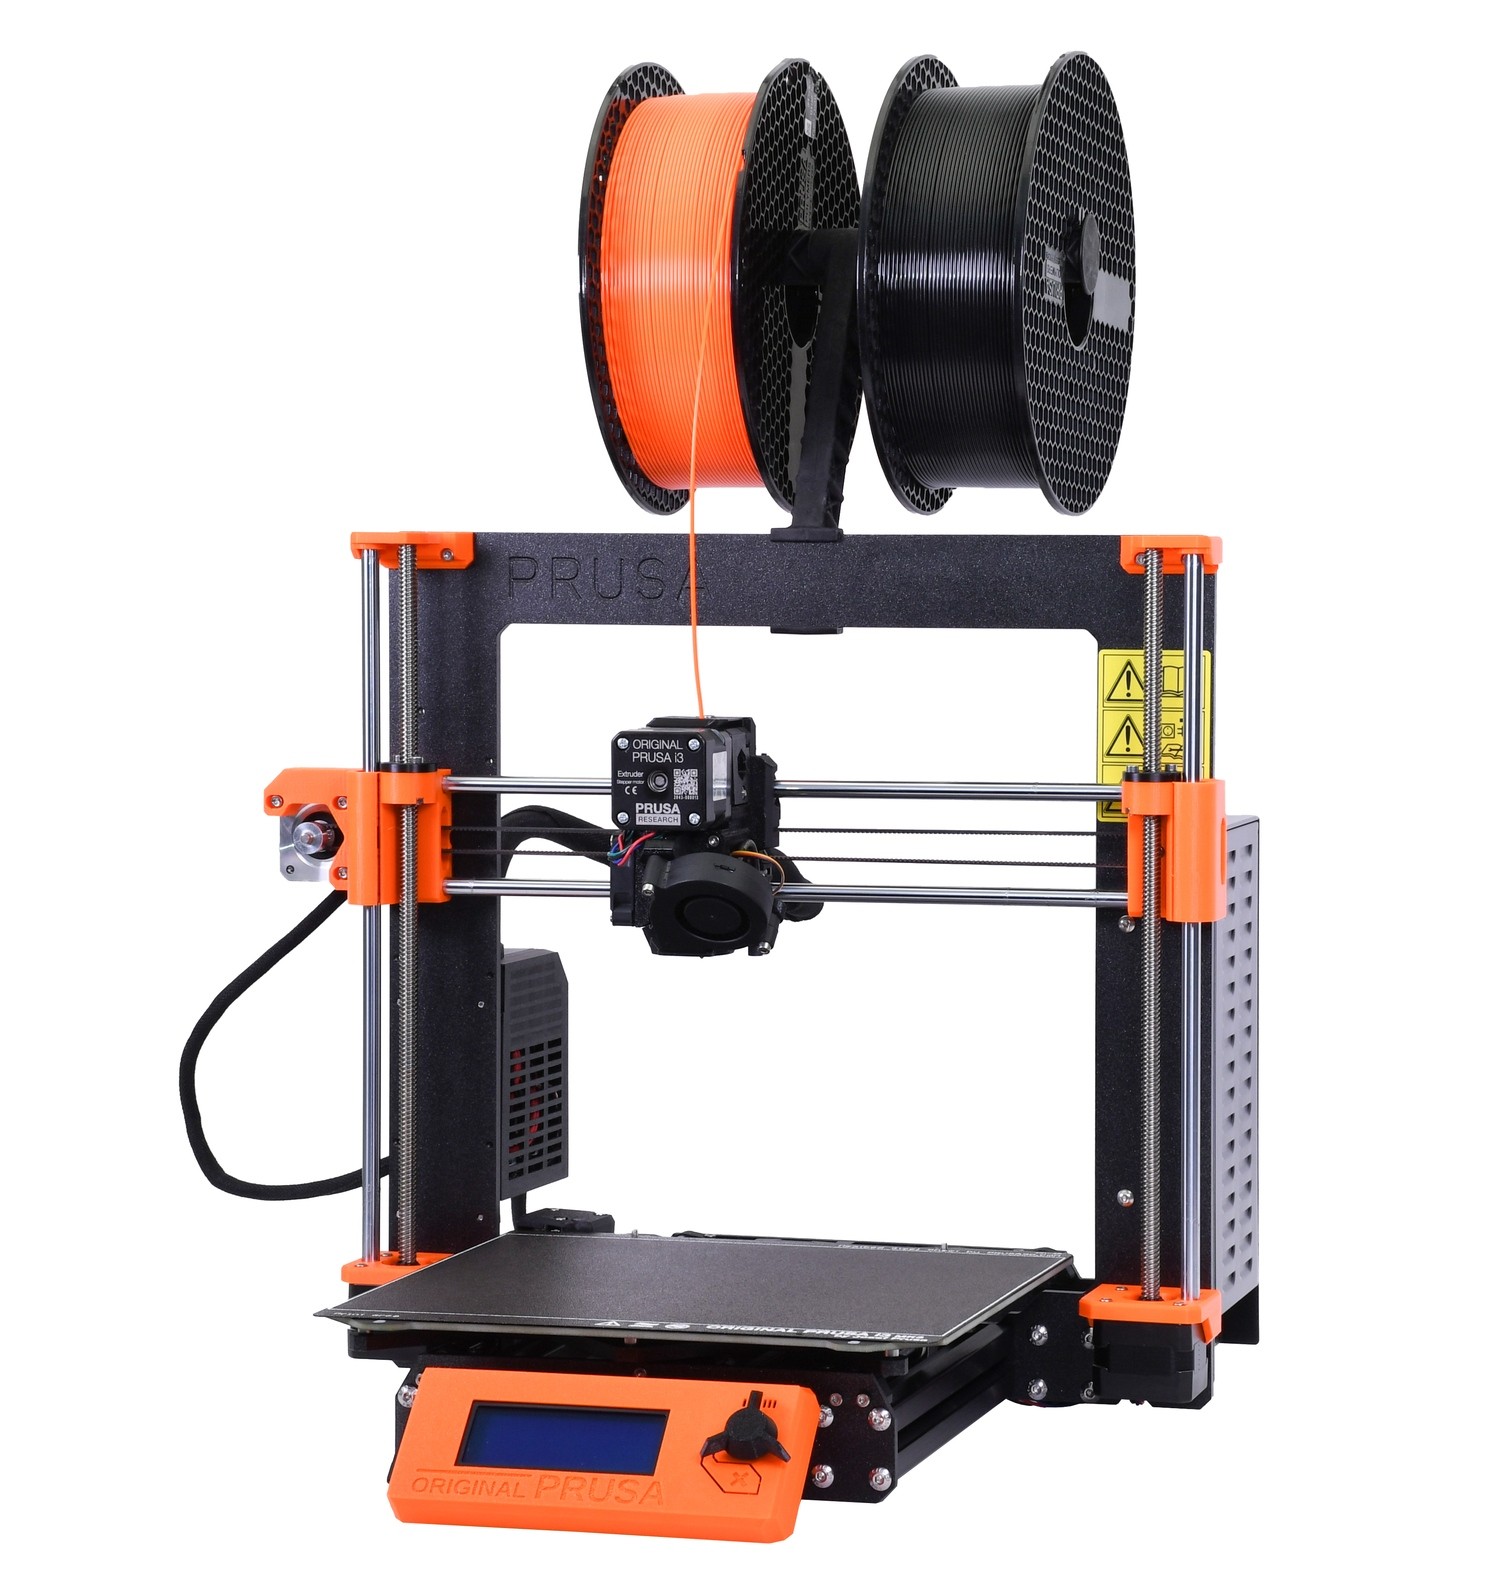
Now that We’ve the same idea I’ll continue, so I have a 3D printer that helped me many times through college, many projects (and way too many internet memes) were done on that printer, eventually I had to leave it cause I graduated and didn’t need more pieces, so all is hunky-dory in the story c:.
Fast-forward to some months, I wanted to print a chassis for a robot, sliced the model, fired up the printer and let it go but after a couple of minutes the printer’s buzzer starts to sound, it rebooted, and I was left wondering What the hell happened.

So naturally I tried again, because if something fails you must try again under the same circumstances to see if it was a fluke (sometimes it is but most of the time it doesn’t :sadface: ) I ended up with 3 fail prints and me wondering why it failed out of the blue, this is what happened next.
- Wondered if a cockroach eat the wires
- delete the last idea
- Maybe it was the software (sure, working software will blow up just because it’s a Monday)
- Recompile the software
- Upload the software (perhaps I solved it)
- tried again C: (I think I got it)
- Resets :c
- Repeat steps 3 to 7 four more times
Ok, at that point I was mad, how on earth did that happen? Dunno, but it did.
I concluded that the main board was fried, so I went to AliExpress and bought a new one (I had the SKR 1.4 with apparently is now deprecated so I had to choose the SKR 2.0)
After a couple of weeks it arrived at my door, I got excited because I could print again, so I teared it apart and replace the board, flash the firmware (I’ll write another post about it cause it’s actually quite interesting) and got another reset, by that point I was like this.

After all the mumbo jumbo I resourced to google, I don’t remember how I search for it, it was something like “3D printer turns off help me :sadface:” maybe not, but you got the idea. Some googling after I stumble upon an old forum post where they said that eventually the output capacitors in the PSU die after sometime, thus they don’t regulate the voltage as good and a brownout occurs (the voltage in the microcontroller goes below a certain threshold, the microcontroller sees this a problem and turns off everything including itself).
Now I have two working boards and a faulty PSU, I mean at least I know what’s broken
bye.
2021
hoot hoot said the owl
19 Dec 2021
Hey. it’s has been a while but hey I’m still alive, this last few months I’ve been very busy with the school and some other projects and haven’t had time to write, but I’m back.
In the meantime I finished my first semester of my masters and I’m about to finish the second (the time flies D:), I build my first PC from the ground up, it was a terrifying experience to be honest, the part of getting all the parts was so slow, cof cof GPU shortage cof but once i had all the parts i build the test rig to see if it turn on and gave a video signal.
I tried for probably 20mn to secure the air cooler I was terrified of messing up anything, so after shaking like crazy, and been nervous I plug everything, short the power pins and it turn on (this mean that all the components were ok and i could move on)
And I’ve been moving all my files and installing programs, I’m thinking about starting a twitch channel of me doing stuff about electronics, i love the idea I’ll post about it soon. Happy xmas and new years (if i don’t update until then)
bye.
Vivado and Vscode is such a great combo
12 Mar 2021
Hey. it’s has been a while since my last post, I’ve been working on some new stuff, here’s a brief post about what I think is a mod anyone should if using Vivado.
Vivado is a good software, its definetly an upgrade from ISE (I worked with it for about a year and a half) the work flow feels different, each stage can be run separately and you get a result which is more user friendly.
So what ? whats the problem ?, otherwise you wouldn’t be writing this. well the thing is that the editor is bad, its not the worse I’ve seen but it lacks a lot of features that a modern editor would have.
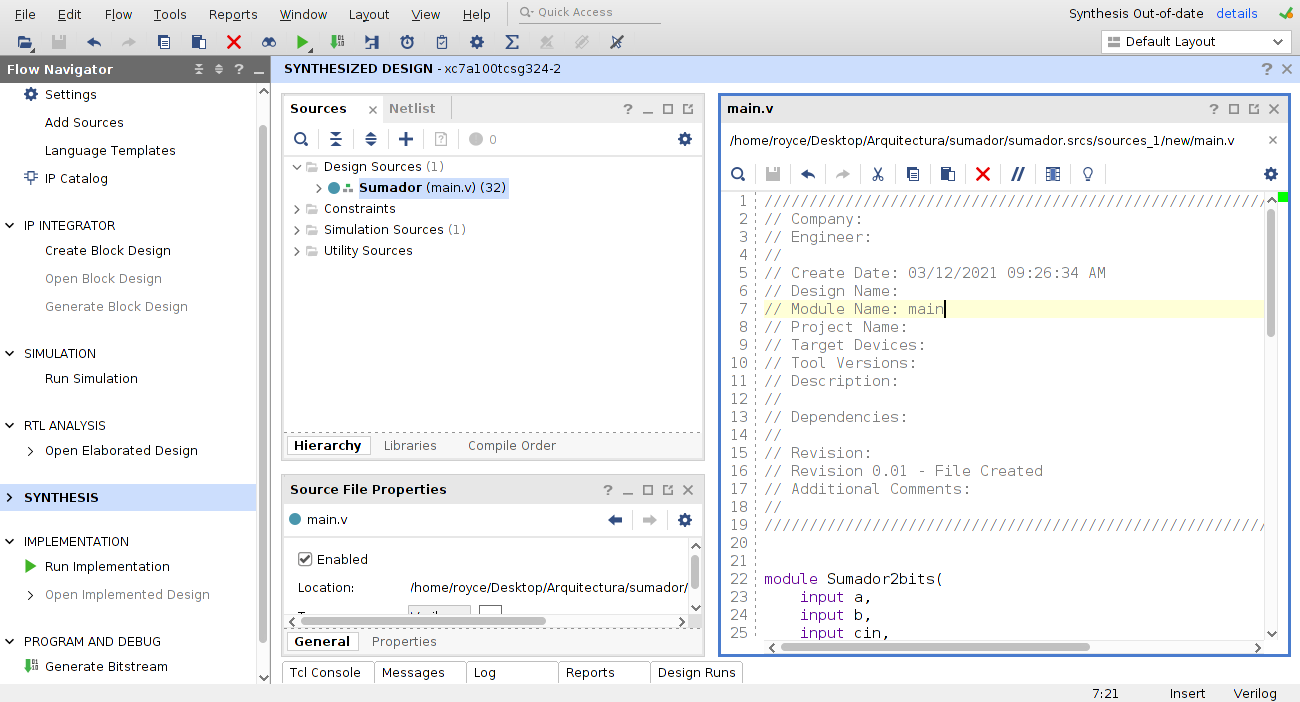
As you can see the workspace is full of other stuff, of course you can minimize a lot of that extra windows and end up with something like this
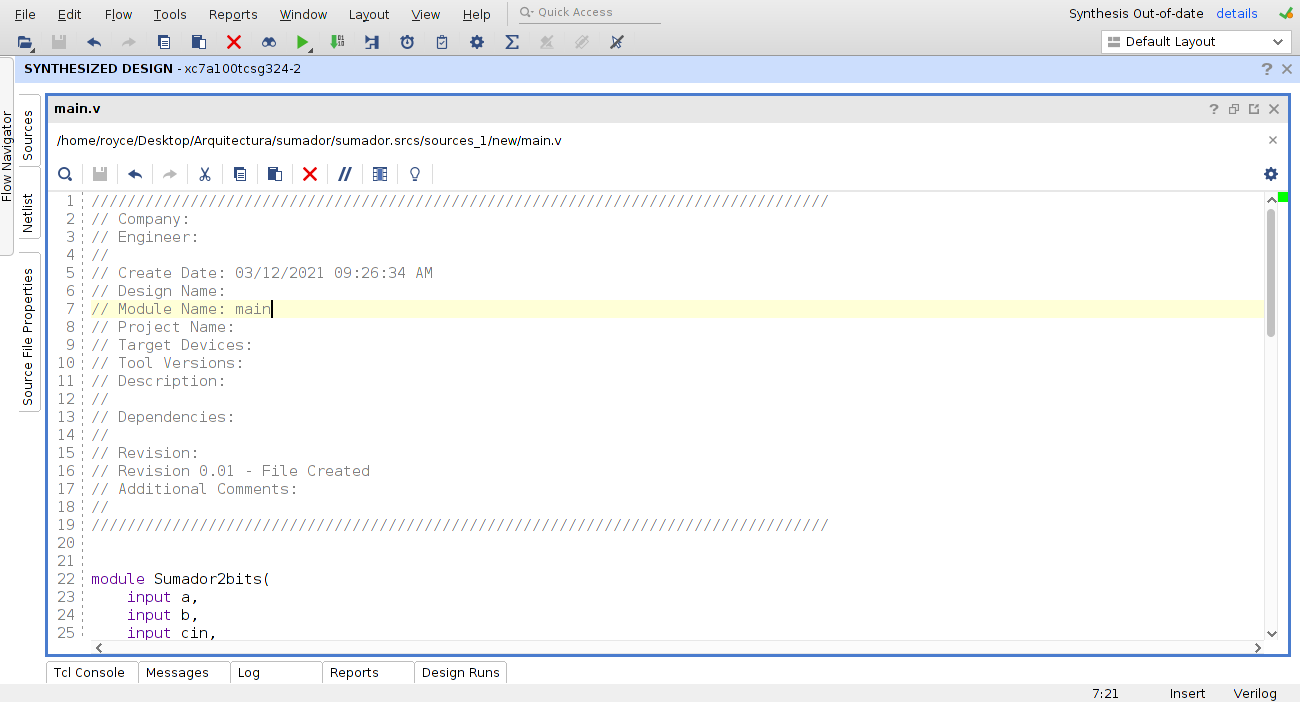
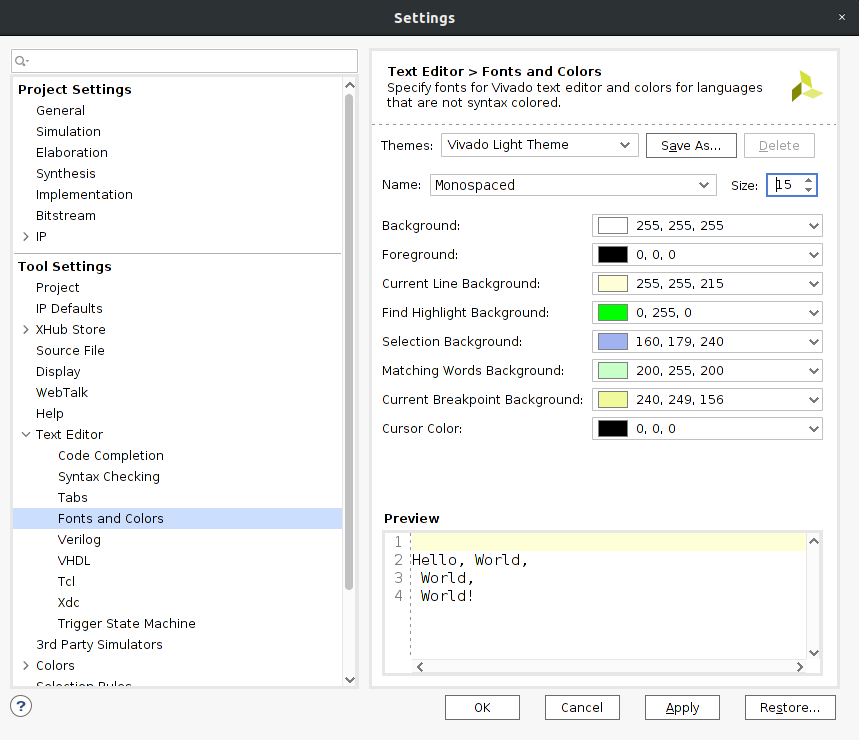
Great, right ? well no, the think is that you can’t increase the font size right away, if you want to do that you have to click on tool -> settings ->Text editor ->Fonts and colors and modify the size of the font, in a window like this
There’s an easy fix for that, use Vscode as an external editor and get all the goodies you’re used to. First thing first, you need to change the settings to open un an external editor go to tools -> Settings -> Text editor choose “Custom editor” from the dropout menu and then click on the three dots a new window like this should pop up
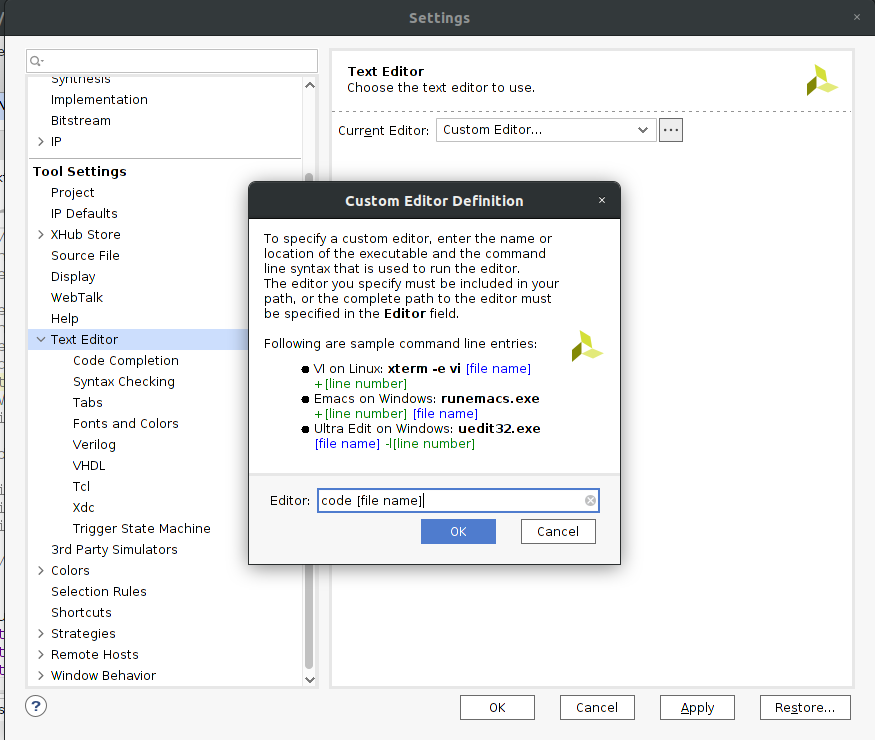
there, where you will put these command
code [file name]
Now eveytime you click on any source file vscode will open up and have that file to edit, now the next step is to add the extensions that will make your workflow smooth as the blues.
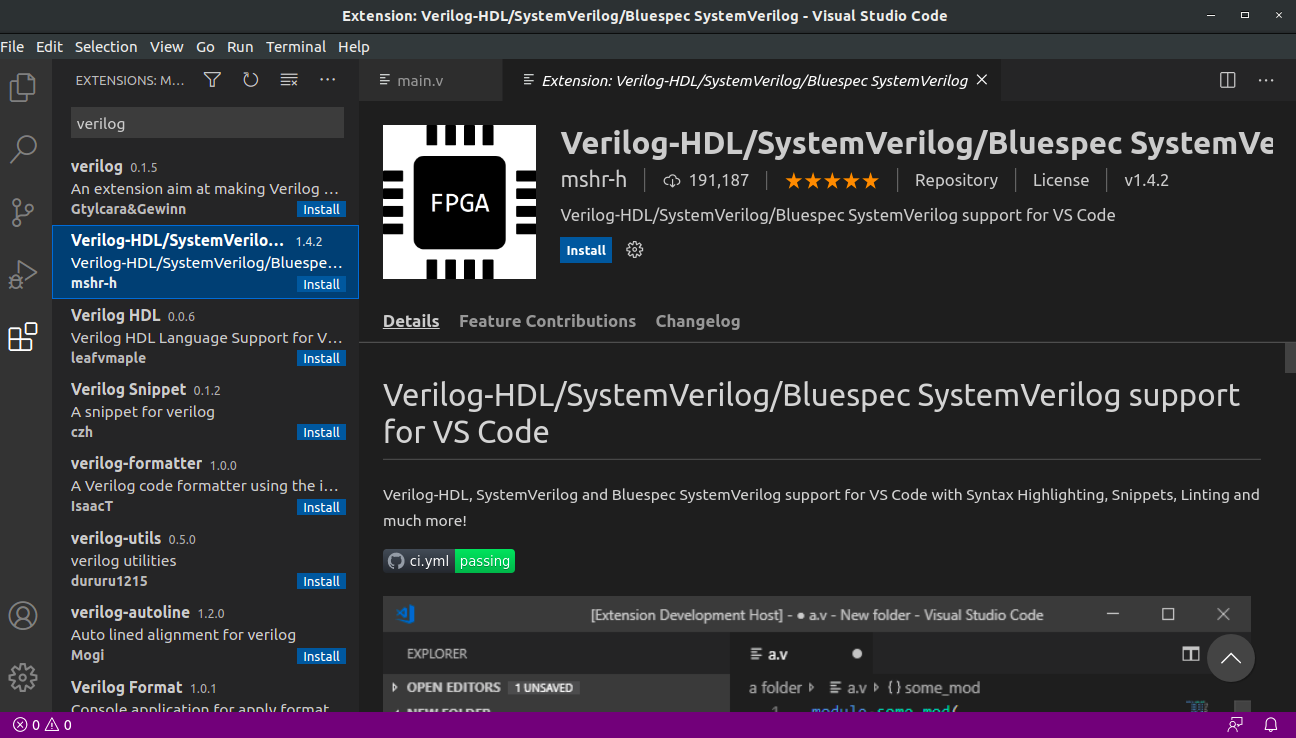
Go to the extensions icon and write “verilog” and the next extension will appear, this is a nice one and has a linter for vivado yai.
Next, search “vhdl” and the next extension will appear.
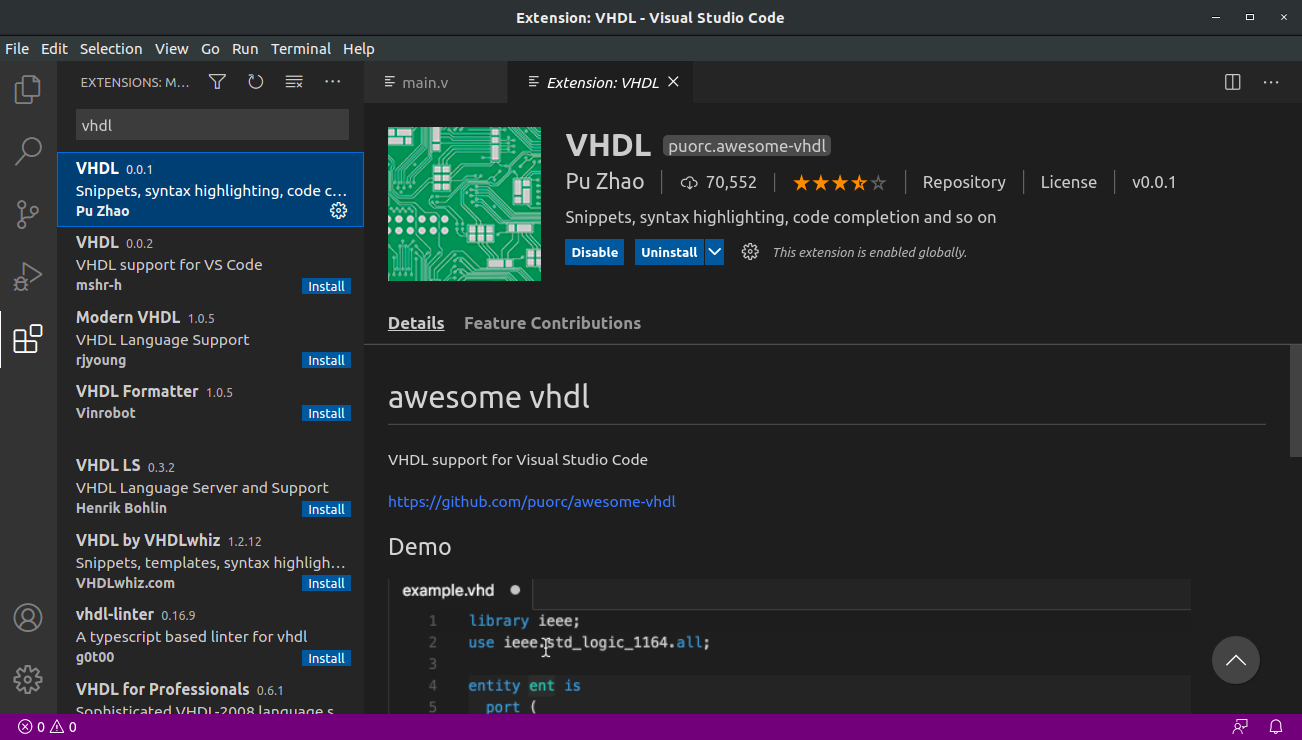
I like to have VHDL and Verilog, in case I have to switch from one to another and just like that you have vscode working with vivado, you can change everything you want, hit save, after that go to vivado and a small icon will appear letting you know its updating.
have fun programming
ESP32-C3, WS2812 and rainbow effect
27 Feb 2021
Hey So last time I was playing with the esp and the example of the WS2812
After reading a little bit more the library I found how to change the colors and it’s quite easy, so the first thing I did was a fade with a single color.
Everything else in the main program remain the same, the while loop was modified with the following code
while (true) {
	for (int i = 255; i != 0; i-=3) {
		// Write RGB values to strip driver
		ESP_ERROR_CHECK(strip->set_pixel(strip, 0, 0, 0, i));
		ESP_ERROR_CHECK(strip->refresh(strip, 100));
		vTaskDelay(pdMS_TO_TICKS(EXAMPLE_CHASE_SPEED_MS));
	}
}
And as you can see it’s pretty easy to get a fade, but I’ll get a little deeper on the library and explain what it is and how it works. At the end I’ll make another program for you to see how it works.
Let’s dissect the code
	#define RMT_TX_CHANNEL RMT_CHANNEL_0
	#define EXAMPLE_CHASE_SPEED_MS (10)
the RMT_TX_CHANNEL defines in which channel of the RMT peripheral will be the signal routed (the RMT peripheral is specific hardware, designed for IR communication, but it can be used as a one-wire protocol, neat huh ?) And the next definition is just to have a common variable for all the delays.
The next chunk of code is something that you’ll probably see a lot on many of the example codes of Espressif, this is error checking, this part of the code is in place to give you a feedback of whether the operation was implemented sucessfully.
    ESP_ERROR_CHECK(rmt_config(&config));
    ESP_ERROR_CHECK(rmt_driver_install(config.channel, 0, 0));
Let’s see the library and it’s elements.
if you go to the subfolder \components\led_strip\include you will find a file named led_strip.h this file has the class definitions for the library of the WS2812 driver.
Now let’s see which elements contains.
esp_err_t (*set_pixel)(led_strip_t *strip, uint32_t index, uint32_t red, uint32_t green, uint32_t blue);

esp_err_t (*refresh)(led_strip_t *strip, uint32_t timeout_ms);

esp_err_t (*clear)(led_strip_t *strip, uint32_t timeout_ms);

esp_err_t (*del)(led_strip_t *strip);
this gives us an inside of how the program works, first all of the methods use pointers, why? by using pointer you’re actually using less memory for temporary variables because you modify the variable in the address it’s stored instead of retrieving the variable, modifying in a temp variable, then returning it to the original address and continuing with the next one (its’s easier to use pointers, from the point of view of programming efficiency, this way of programming is widely used in high performance coding and STM32 cube Mx uses this same paradigm).
esp_err_t (*set_pixel)(led_strip_t *strip, uint32_t index, uint32_t red, uint32_t green, uint32_t blue);
this line of code tells us how the driver works, we parse the pointer of the led strip, the index of the pixel you want to modify (0 to n-1), then the value of Red, Green and Blue color than range from 0 to 255.
esp_err_t (*refresh)(led_strip_t *strip, uint32_t timeout_ms);
this line of code tells the ws2812 to refresh the values of the color and you specify an timeout, if the proces takes longer than this timeout to complete an error is raised, this will let you know that something went wrong (maybe a loose wire or bad connection)
esp_err_t (*clear)(led_strip_t *strip, uint32_t timeout_ms);
this line of code deletes all the values of color for the pixel, essentially turning it off
esp_err_t (*del)(led_strip_t *strip);
this line of code deletes the led_strip object this will release all the resources for other task of the processor
Now you know a little bit more about the library of the WS2812, now I’ll leave you with a rainbow effect.

you can find the main program here.
bye
Vivado and the shortcut problem
24 Feb 2021
Hey, nice to see you again.
A new (online) semester has begun and with it new projects, challenges and bugs await (i can almost taste the time I’ll have to spend debugging or smashing my head againts the wall ‘cause something doesn’t work)

This is my first semester as a master’s student and I have choosen the high performance computing branch, this means that this semester I’ll be having the course “Microtechnology and processors architecture”.
As a final project I should implement a processor on an FPGA (during my B.E. I had two courses were I worked with FPGA boards). Now I have to use a new IDE, Vivado.
Vivado 2020 installation
Installing vivado was pretty straight forward, by request of our professor it had to be done on linux (I choose ubuntu), the thing is that after the installation finished I got no shortcuts on the desktop. I could use the command line every time to start the program (but tbh I’m a little lazy about that regard and i like the ease of clicking an icon and getting it working).
So i had to create the shortcut manually and here is what you should do if you want to do it too.
Create the run command
First we’ll create the run command file, use the following command
sudo gedit /usr/local/bin/run-vivado-run #(you could use any other name)
Next put the following command (this is the installation path of vivado) on the text editor then hit save
#!/bin/bash
. /opt/Xilinx/Vivado/2020.2/settings64.sh
vivado &
Create the shortcut Now we’ll create a shortcut, run the following command.
cd ~/Desktop/
sudo gedit "Vivado 2020.2.desktop"
This will open a text editor window, and there you can paste the following command.
[Desktop Entry]
Version=1.0
Type=Application
Terminal=false
Icon=/opt/Xilinx/Vivado/2020.2/doc/images/vivado_logo.ico
Name[en_US]=Vivado 2020.2
Exec=/usr/local/bin/run-vivado
Name=Vivado 2020.2
StartupNotify=true
Save the file and you’re almost good to go, next we have to change the permission to execute the file.
sudo chown $USER:$USER "Vivado 2020.2.desktop"
Now you can click on the shortcut on the desktop and a windows like this should pop out
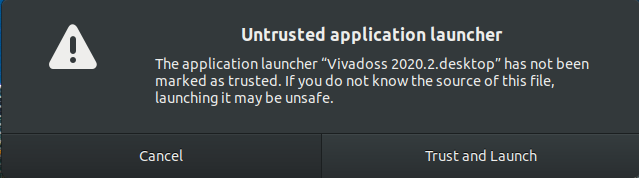
Hit trust and launch there you go, a handmade shortcut for vivado (only in case that the installer doesn’t install it for you)

That’s everythin for this entry.
Bye.
Programming the ESP32-C3
22 Feb 2021
Hey, nice to see you again.
Last time we installed the latest version of the ESP-IDF, now we will program the board with to programs (just to get started, in the future I’ll upload more as I progress). We’ll go the easy way and use the included software and made some minor tweaks.
Blink
Ahh nothing says hello world! as a blinking LED, maybe the “Hello world!” itself. First go to the esp folder, then the examples folder and then the get-started folder
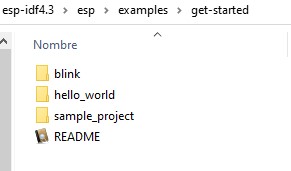
Copy the blink folder to another location (after compiling the project some files are overwrite and trying to compile it for another target like the esp32 or the esp32-s2 will result in failure, if you won’t change the target microcontroller, you can use the same folder without any problem).
Next you’ll open the ESP-IDF command prompt that we installed the last time and change the directory to the new blink folder.

Next you’ll enter the next commands:
idf.py set-target esp32c3
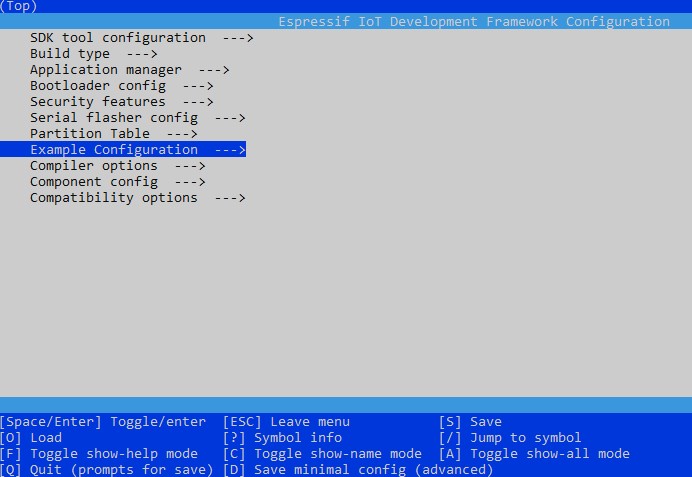
idf.py menuconfig
the first command will change the target microcontroller to the ESP32-C3 and the second command will open a menu where you can change the settings of the example program without to much hassle, this is mainly for quick and easy tweaks, bigger changes will have to be made in the source code.
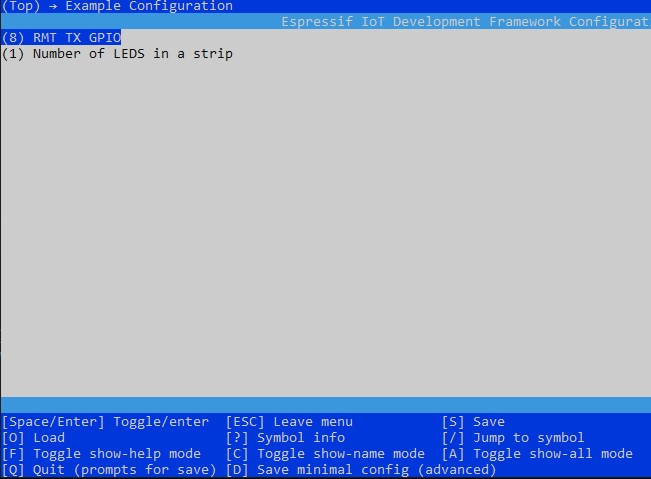
On this menu go to the Example configuration, here you can change the pin that will be used as an output, I’ll be using the pin 8 but any pin will do, enter the new pin, hit ‘esc’, hit s, enter again and you’re good to go. You can skip this step and go right ahead to the programming part
Type
idf.py flash -p COM9
replace with your respective COM port and the program will start compiling the project automatically, this might take a while the first time (couple of minutes maybe)
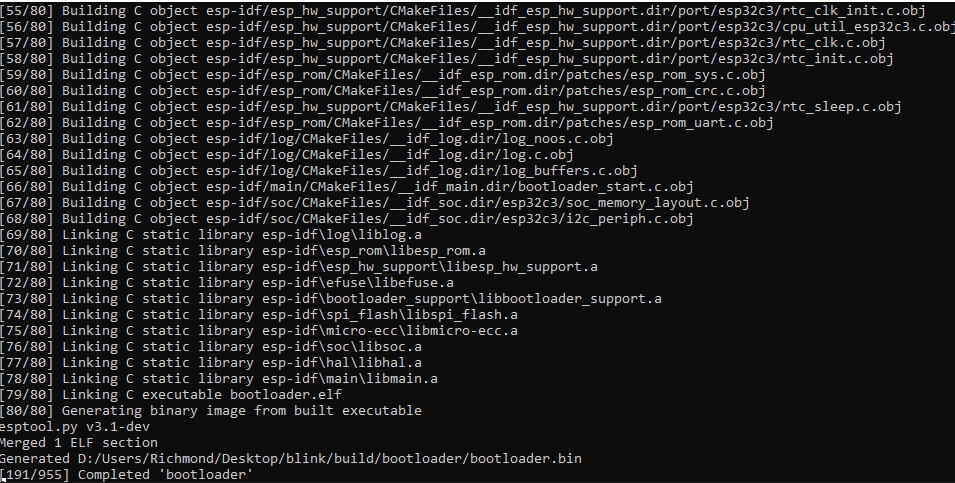
After compilation is done it will upload the code automatically, at the end you should see a log message like this.

And just like that, you have a blinking LED.
RGB led
Now that you’ve some experience with the basics you can actually make the included RGB led flash (it’s kinda like a ws2812, not sure if that’s the correct part) very easily.
Again will do a copy but now from this folder examples\peripherals\rmt\led_strip
if you haven’t closed the ESP command window just change the path with cd and the configuration, the addressable led is wired on the pin 8, and change the number of leds to 1, the window should look like this.
finish, save and like before upload the code with
idf.py flash -p COM9
Just like that you can have the on board LED flashing.
Running the examples is really easy, but this are just examples, next time i’ll add some colour to it.
bai
Can't wait for tomorrow
21 Feb 2021
Hey.
Tomorrow I start my first semester in the CIC, I’m thrilled about the new opportunities, the future that awaits and the unknown.
I can’t wait for it to start, but I can’t help to think about everything that has happened to me in all of this years, many persons have come and go, few friends have come and gone I still keep in touch with some of them. And a pandemic has shown us the fragility of life, it has taken away from us many loved ones and has proven the importance of meaningful relationships, no man is an island.
I went down memory lane and remember my time at secondary school, saw pictures of my old school and remember how old was everything, I had to use encyclopedias for research, read books and use Encarta (kinda like a digital library, kinda old tbh), but still, everything was really simple, network television was awesome and i could listen to music, I had a PSP wich for me was amazing, the resolution of the screen, the games, oh man that feel like the future (I still have it, it works, but now I use it for retro gaming).
the high school was harder but still manageable, except for my trigonometry class I almost failed in that class, I had never had that feeling of not understanding something, trying and still failing a feeling that would follow me until this day (we have come to terms. We have a healthy relationship now, where it pushes me out of my comfort zone and I push back by studying and getting better). I meet a lot of people and even got my passion for electronics and electronic design kickstarted there, back then it looked like another school, you know 3 years of doing something and then I was going to go to college, but now I can see that I was wrong.
I meet so many great guys and gals, played videogames on some Nintendo DS that some peers lent me, find new passions and most important I change my mind about the IPN, I learned to love this institution, not by the installations nor the school, but for the people, professors and students. Now I see the pictures that I have from that time and honestly, I wish I had appreciated it more, it was gone very soon.
College was a different story I spend more time with peers, probably slept an average of 4 to 6 hours, embark on new projects, got frustrated for many tests; drank lots of soda, water and coffee, slept many times in a chair on the campus (I was really tired at the end of each semester and 10mn of sleep were the very best). I met my boo I love her so much, admire her work ethic, her sense of humour and overall personality (if you can see this, love you).
I don’t know what the future holds for me, but I’ll try to give my best and enjoy it
bai
ESP32-C3 is here, what should I do ?
15 Feb 2021
Hey, nice to see you again.
About three months ago Espressif leaked the specs of a new IC, the esp32-c3. We’re talking about the same company that is responsible for the ESP8266 (the best thing that could have ever happened to the IoT scene) and has single-handed sparked the new iot wave.
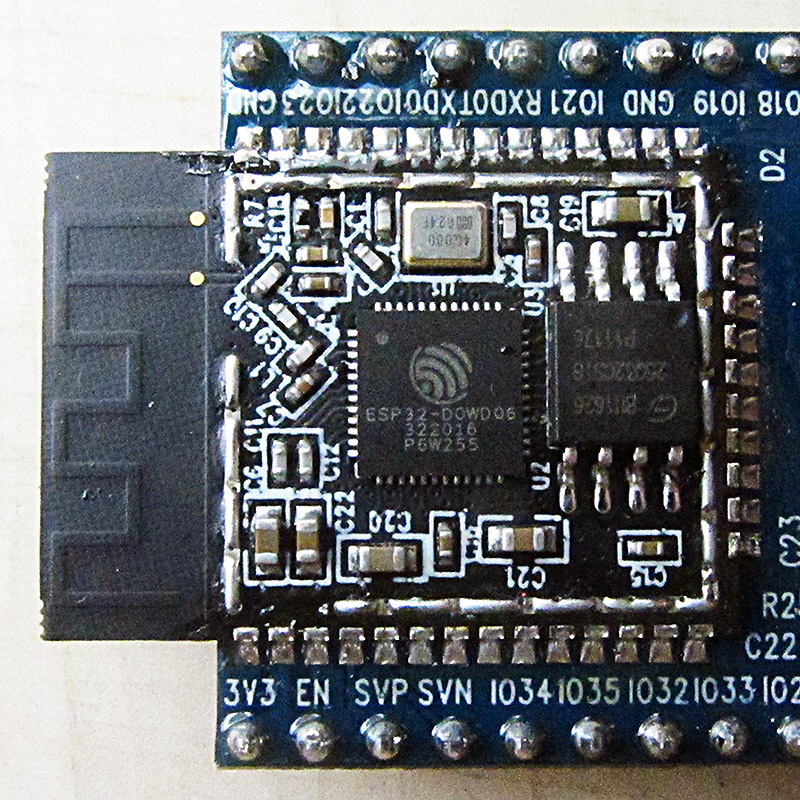
So a couple of weeks ago @John Lee post a this tweet

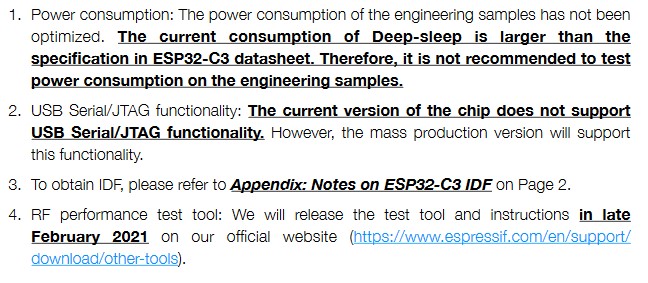
I mean, dev boards (obviously engineering samples or pre-production ones) with the new chip, how could I say no? So I send him an email and got a response some days later. Fast forward to today and I have in my dry hands (a side effect of hand sanitiser and lots of soap) the esp32-c3, before we begin with all the fun and stuff. This is an engineering sample, therefore, it lacks some of the final features as described by the letter sent to me.
ESP-IDF
So if you wanna program this IC you’re in for a ride (I did and stumble against the wall for a couple of hours) but don’t worry here you will find the easy way. First of all, you need to install ESP-IDF this is the framework that will allow you to compile for the new RISCv processor, but it works only with the latest version (4.3). You’re going to download the prerequisites you can find it here.
Download for your OS and next you’ll find a window that looks very similar to the following one (I’m doing it on windows but it should be the same for any OS)
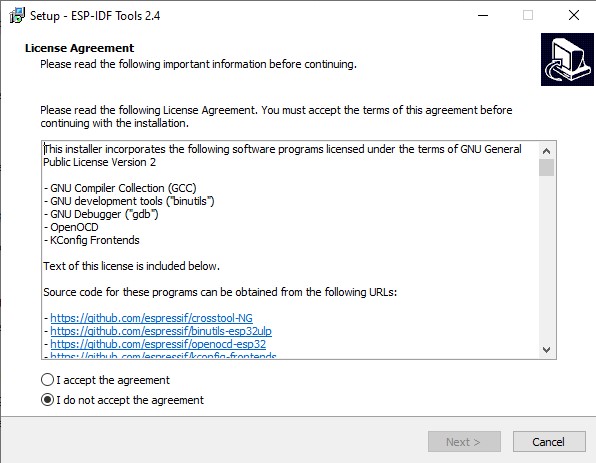
Click accept and then next, and also next on the following window. Then a window will ask you if you wanna install GIT or use one that you already have (git is in charge of downloading the info from the repositories), the next window will ask you if you wanna download ESP-IDF, and next which version, you should select the master branch
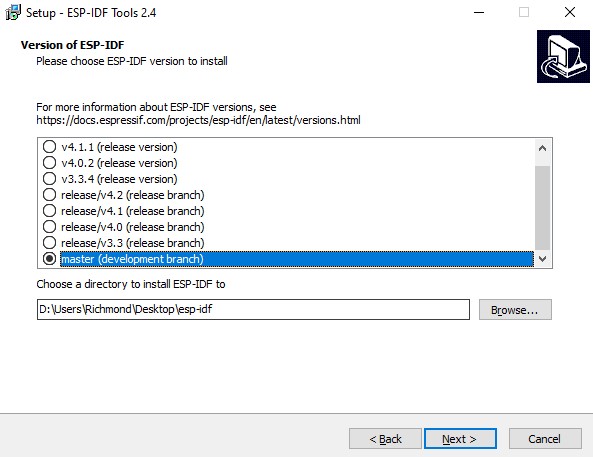
the master branch is the only one that has the definitions to use de c3 chip, the rest of the instructions are pretty straight forward, just leave it as is and click next when prompted.
In the end, you should see a new icon on your desktop or startup menu named ESP-IDF, when you click on it, a new command window opens and it adds temporarily the tools path and leaves you a nice message

now you can compile and upload the projects, use this window always.
VSCODE extension
Is there a Vscode extension, right?, yes, Does it work? absolutely.
But here is the kicker, it only works with the stable version of the ESP-IDF (4.2 and below) so if you try to use the master branch it will fail on installation, if you try to replace the files, it won’t recognize the configuration and prompt you to start over (I did this, and is really frustrating to see it failing over an over).
Please don’t use the extension if you wanna use the C3 chipset, otherwise is an excellent tool that simplifies the process of coding, compiling, flashing and monitoring (I tried it with a normal esp32 and it’s wonderful, feels like an Arduino uploading process but with so much more power), kudos to all the Espressif team for that extension, love it.
On the next post i’ll walk you throug the programming of the esp and some examples anc configuration.
bye.
New year's post and recap
01 Jan 2021
Hey, nice to see you again.
Well this is a new year’s eve post, expect a to see a lot of text (maybe not to much, but you had been forewarned)

2020
Hey, do you wanna know about jekyll ?
15 Dec 2020
Hey, nice to see you.
Well one of the things that i struggle the most when setting up this blog was the configuration, for starters i have no idea of web design, so you may ask, how did you made this blog, well i used a tool (i dont know if it’s called that way, but follow me).
Jekyll converts regular text into web pages, kinda like readthedocs, another excellent tool. Jekyll also has this awesome page with lots of templates where you can choose from, and here are some of the things you have to keep in mind if you wanna do a blog hosted on github pages.
Download the template
First choose a template from jekyll, download the file from github, in my case i choose the friday-theme, because it looks cool and simple.
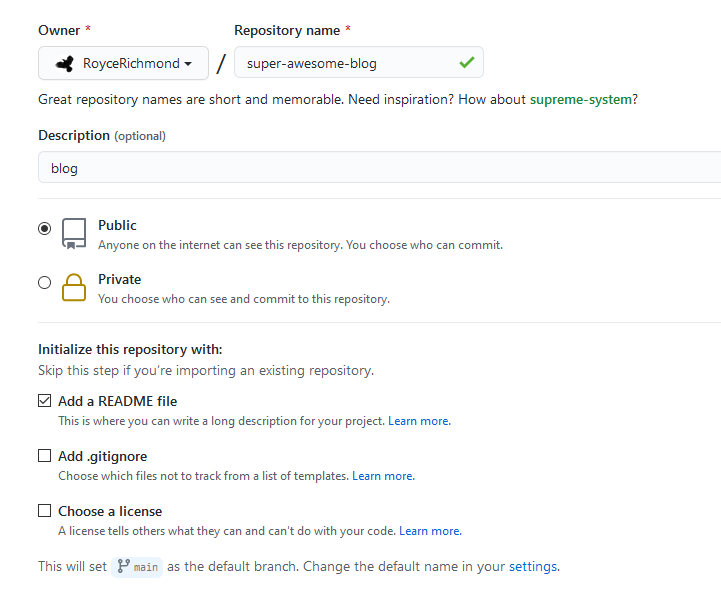
Create a repository
OK now you can create the repository with the name that you want, make sure that you remember the exact name, we’ll use it later, and initialize it with the README.md
 modify the _config.yml
the _config.yml file contains some basic configuration for the general use of the template, one thing that you should pay attention is the base_url.
 the base_url should match the name that you use in the repository, in this case super-awesome-blog (that sounds really cool btw) ##WARNING## if you the names don’t match you’ll have problems, this is because once the page is uploaded the html file will try to look for a specific address and never find it (realizing this took me 3 days :c).
Upload the files
Now you can upload the files as needed, I prefer to use Github desktop.